Photoshop
Moderators: Big-O Ryan, Big-O Mark, Matt, jester22c
-
Master Jedi
- Guru

- Posts: 1161
- Joined: Sat Jun 15, 2002 10:34 pm
- Contact:
-
fuuucckkers
- Moderator

- Posts: 815
- Joined: Sun Sep 22, 2002 3:33 pm
- Contact:
-
Moon Child
- Veteran

- Posts: 318
- Joined: Sun Dec 15, 2002 6:45 pm
- Location: Bowling Green, Ohio wishing I was with LP
- Contact:
-
Master Jedi
- Guru
- Posts: 1161
- Joined: Sat Jun 15, 2002 10:34 pm
- Contact:
-
fuuucckkers
- Moderator
- Posts: 815
- Joined: Sun Sep 22, 2002 3:33 pm
- Contact:
-
Moon Child
- Veteran
- Posts: 318
- Joined: Sun Dec 15, 2002 6:45 pm
- Location: Bowling Green, Ohio wishing I was with LP
- Contact:
-
Timelessblur

- Extreme Groupie

- Posts: 800
- Joined: Sun Dec 15, 2002 9:06 pm
- Contact:
good I was not the only person who had a good idea where that came from. (I knew I had seen it but I coudl not put a name to it)
http://www.myimgs.com/data/timelessblur ... omulan.jpg
Yeah I know I got pulled in but its a nice way to kill time
my link for kings of Choas
Yeah I know I got pulled in but its a nice way to kill time
my link for kings of Choas

-
Moon Child
- Veteran
- Posts: 318
- Joined: Sun Dec 15, 2002 6:45 pm
- Location: Bowling Green, Ohio wishing I was with LP
- Contact:
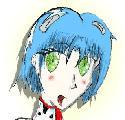
It was on tv when I posted that... plus its quickly becoming a fave of mine. I even created a character for an online rpg based on Kagome....Timelessblur wrote:good I was not the only person who had a good idea where that came from. (I knew I had seen it but I coudl not put a name to it)
Can't wait to see more pics... I don't have photoshop anymore... but I do have another image studio that I might work with and maybe post something again...
~Maeg
Resident LP Fanatic
*Nobody likes you when you're 23* - Blink 182

Resident LP Fanatic
*Nobody likes you when you're 23* - Blink 182
-
Master Jedi
- Guru
- Posts: 1161
- Joined: Sat Jun 15, 2002 10:34 pm
- Contact:
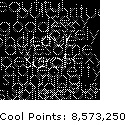
It's easy...x Wasted Mind x wrote:How do you go about creating those images? highlighting it and the image appears hidden under the 'noise' ..
PSP 7:
1) Acquire the "Hidden Image"
2) Create a "New Image" with the same dimensions
3) On the "New Image" use the Effect->Noise->Add filter a few times
4) Make a new 2 by 2 "Mask Image" just like the one in the picture (it's zoomed in to show detail
5) Select the "New Image" and click Masks->New->Show All
6) Click Masks->Edit
7) Select the flood fill tool (the one that looks like a paint can)
9) Click on the pattern that appears in the Style box to show the pattern selection dialog
10) Click on the drop-down style dialog and select the "Mask Image" (If its the second image you created it should be called Image2) and make sure the Scale is set to 100%
11) Left-Click on the "New Image" (the one with the noise)
12) With the New Image still selected, click Layers->New Raster Layer and use the default settings.
13) Click Layers->Arrange->Send to bottom
14) Open your "Hidden Image" and press Ctrl+C to copy it
15) Select your New Image and press Ctrl+E. The picture will appear under your cursor. Move the cursor until the first coordinate in the status bar says (0, 0) and left-click.
Now you're done with the hard part. What you have to do now is Colors->Adjust->Brightness and Contrast to each layer individually (Use the layers menu to switch between layers). You want both layers to be very low in contrast so you cant see the Hidden Image if it's not highlighted. The brightness is really a matter of preference and it usually has little effect on the visibility of the hidden image. The contrast is the important part.
Fin.
Note: If you're going to save it as a JPEG, USE A VERY LOW COMPRESSION SETTING, otherwise the image will be smoothed and you'll lose your hidden image. GIFs are pretty good for this type of image.
- Attachments
-
- image4.gif (7.68 KiB) Viewed 6397 times
-
- image3.gif (2.62 KiB) Viewed 6397 times
-
fuuucckkers
- Moderator
- Posts: 815
- Joined: Sun Sep 22, 2002 3:33 pm
- Contact:
-
Master Jedi
- Guru
- Posts: 1161
- Joined: Sat Jun 15, 2002 10:34 pm
- Contact:
Step 12 creates the layer to contain the image. You send it to the bottom to put it behind the noise layer. When you hit Ctrl+E (assuming you followed my instructions exactly) it will paste your image as a floating selection INSIDE the bottom layer. You can disselect it by pressing Ctrl+D so it will no longer be a floating selection, but that doesnt really make a difference cuz the selection area should be the entire image at that point.
-
Master Jedi
- Guru
- Posts: 1161
- Joined: Sat Jun 15, 2002 10:34 pm
- Contact:


I made this last night for a buddy icon, and i saw this thread was up. I like it, it took bout 5 min to make but i think its pretty cool. And the other one i was jus messin around. The buddy icon is the small one.
- Attachments
-
- liq.psd.gif (49.54 KiB) Viewed 6337 times
-
- tone.psd.gif (3.09 KiB) Viewed 6338 times
tone
Who is online
Users browsing this forum: No registered users and 1 guest